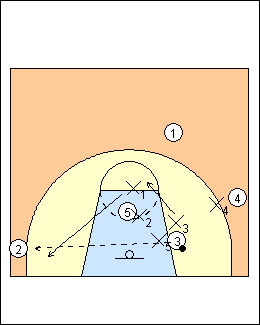
Forcing left
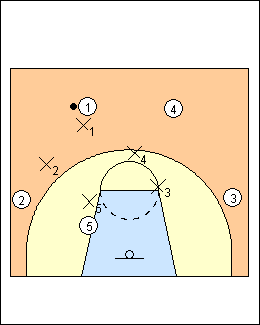 | 1 See Defences - Forcing left basics, also Forcing left pack. Forcing left means influencing all ballhandlers to use their left hand, allowing passes to the attacking left (gap), and denying passes to the attacking right. Promote ball reversal to the attacking left-wing lock-in spot. All five defenders are guarding the ball. There is help and recovery to stop the ball by the gap and deny "buddies" to the side of the on-ball defender, with rotation to help the helper as needed. X1 pressures the ball in the slot with a square stance, forcing left towards the sideline by splitting the attacker's right foot. Jump back (pop off) if the ballhandler jabs to his right, triangle (drop step or hip turn) if he jabs left. X2 denies (on the line, up the line), X4 gaps, an open, sagging position well inside the arc. Gap defenders typically don't allow attackers to get the ball in shooting range. Deny positions may depend on relative athleticism. If your team is more athletic, you can extend denial and still recover on backdoor cuts. If less athletic, you can limit denial, e.g., to one step beyond the arc, and gap beyond that. Denial beyond ball level is vulnerable to backdoor cuts. Off-ball defenders maintain triangle principles. To prevent penetration, ideally there would be defenders near the ballside elbow and block when the ball is on one side, and elbow-elbow coverage with the ball out top. Defenders jump to the ball on each pass, in part to be able to stop penetration on the first dribble. Be in position on the catch, turn and sprint (don't slide). Roy Williams - the on-ball defender gets into a square stance with hands out, the ballhandler won't run into his arms. Deny with one hand in the passing lane, it's not ear-on-chest, make them think a pass is there, and it's not as easy to get beat backdoor. Brian Goorjian - guarding a dribbler, they teach "one in, one up" - spear hand in and opposite the ball to discourage a crossover, deflection hand up on ballside to discourage a pass. Prior to the dribble, the hand on the same side of the ball should mirror it to discourage a pass or shot, the other hand is "spearing in" so the ball can't be ripped through into a drive. Other coaches like a "wingspan" to take up space when guarding the ballhandler. Dick Bennett - the gap position is your help (pinch closer to a quick ballhandler, build a wall), there is no help move, only recovery (you have to be able to get to the ball on a pass, not intercept it, use a closed stance for quicker close-outs). Scott Clark - gap in a closed stance so as to stunt (open) on the first dribble. Flip Saunders - give help, but make sure you contest the shot (less help if you are slower or to take away a 3-pointer). Allison McNeill - pack defence - one defender is outside the arc pressuring the ball, the other four are inside the arc preventing penetration. When defending a player one pass from the ball, be two steps to the ball and one step off the line. Ian MacKinnon - close out with both hands up or at least left hand to force left. X1 follows the shooting track with his left hand, palm down, closing the gap as the ball rises to the shooting shelf. If a player is guarding the opposition's weakest offensive threat and the ball is in the hands of their best player, help early on any attack situation (it depends on match-ups). If helping big on small you can help late, if helping small on big you need to help early. Force a left-hander right, to his weak hand. |
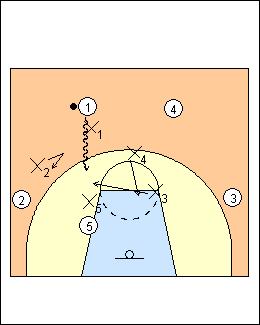 | 2 By default, a gap or deny defender will help and recover, i.e., help stop dribble penetration (ideally without losing sight of his man), then recover when the ballhandler picks up the ball, passes, or the on-ball defender recovers. However, depending on match-ups, a coach can decide on different options, e.g., here consider gapping on both sides if 1 is a good dribble penetrator, since it is hard to deny and stop penetration against a good player. Conversely, if 2 is a shooter, X2 can deny and only stunt and recover on penetration (shown), or even stay at home. If 1 does penetrate from the top, low weakside defender X3 helps and X4 rotates down to help the helper. Some coaches don't allow ballside help, some insist on it (by the "buddies" on each side). Allison McNeill - don't help off the wing (at the international level an open 3-point shot is a 50% shot), they will hedge and recover. Rotate the weakside lowest player. Ian MacKinnon - if X2 stays with 2 (a shooter), weakside X3 helps (not X5) and X4 shoots the gap to help the helper. Help comes from the weakside defender closest to the baseline ("baseline-most"). Bob Huggins - the 3-point shot changed the game. On dribble penetration, they used to help and recover in line, getting as deep as the ball, which allowed a direct kick-out pass but for a lower-percentage outside shot. However, now that shot is for 3 points, so help is in line with ball and man, not allowing a direct pass. Jamie Dixon - stunt and recover without losing sight of your man or committing your back foot. Roy Williams - you can't help up the lane on a drive from the top, fake or they will throw it right to your man. Stuart Manwaring (FIBA Oceania) - on a drive through the top of the lane (through the foul line), help defence should be able to come from the guard area. |
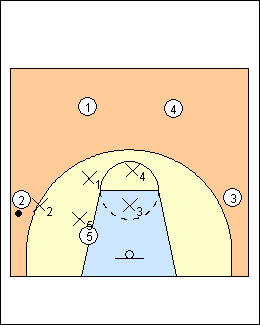 | 3 With the ball on the attacking right wing, X2 angles 2 towards the top of the arc, his bottom (left) foot closer to the baseline than 2's bottom foot. X1 gaps, X5 defends 3/4 from the top, on a post feed he would jump behind to take away baseline. To shrink the floor, helpside defenders typically split the midline (a helpside "i", shown), but can be weakside when the ball is above the foul line, and ballside when the ball is below it. Don't cheat as much to ballside if you are defending a shooter or scorer, cheat more if defending a non-scorer. Other adjustments are also possible: - have at least one foot in the lane (Roy Williams) - have one foot in the lane if the ball is above the foul line, two feet in the lane with the ball below the foul line (Allison McNeill) - if the dribbler is being forced toward a gap defender, weakside defenders don't have to help as much, they have one foot in the lane (Jack and Dick Bennett) - the low weakside defender can widen out if there is a ballside low post who is not fronted (coachesclipboard.ca), or move ballside if the ballside low post is open - play weakside defence by covering the nail (plug), elbow and block (Herb Brown) - Seth Millar (pack line) - try to send a wing with the ball to the top of the key, on helpside think block and elbow, you don't have to sink under the basket - two passes from the ball have one foot in the lane, three passes away be midline, four passes away be ballside. Ian MacKinnon - X3 and X4 are on the midline, X5 defends 5 in the low post 3/4 high side. On a post-entry pass, force weak hand. Seth Millar - 3/4 high side is great because on a pass from the wing to the top the main concern is a duck-in, you are already on the line, up the line. Mike Woodson - on a wing isolation, you can force middle or sideline so long as the ballside elbow and block are covered (he prefers to force uphill away from the basket and toward the help). Dick Bennett - with the ball on the wing, 3/4 from the top side, a post feed is OK, don't go for an interception, jump behind the attacker on air time, it's the same move whether or not you are trapping. You can make a bad player a good player by fronting, he can rebound. Not giving baseline on the wing means not having to rotate under the ball. If there is a pass into the low post, X5 slides behind, so low weakside defender X3 doesn't have to help, he can stay at home - if he comes much closer than the far lane line, he has come too far. If he rotates across, he can't cover a shooter on ball reversal (which is not denied). |
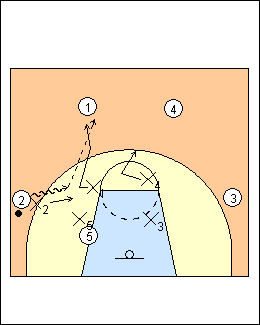 | 4 Here X4 and X3 have widened out with X1 in the gap. Middle penetration can be attacked using a help rotation, or help and recover (shown) - if X2 does not turn back 2 then X1 gives help, and X4 helps the helper by bluffing at 1 if 2 passes to him, then X1 recovers to 1. Allison McNeill - on middle penetration cut off the driver then recover quickly to your own, this is often a hedge and recover move. coachesclipboard.ca - teams may choose to force outside and allow no middle penetration, attack middle penetration and rotate similar to how they handle baseline penetration, or hedge and recover to slow down the penetrator and allow time for the defender to recover. Ian MacKinnon - when 2 passes, X1 stays with 2, X4 takes first pass, beaten man X2 goes opposite the pass and has leftovers, he takes whichever attacker is left open. Helping and recovering is an option if a helper doesn't lose sight of his player. See Defending - 3 on 3 kick-out and Forcing left shell. See Defending - Fratello 3 on 3 drive and kick for stunt and recover and full rotation. Stuart Manwaring - on a closeout you must recover to the line between the ball and the basket and ahead of the ball, so you can stop a layup then move forward as needed to stop an outside shot. If you try to move toward the dribbler, he will explode past or you will be forced to foul. |
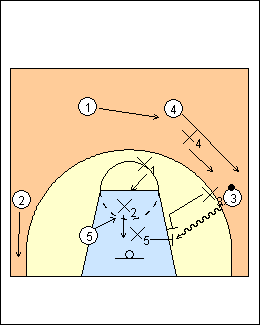
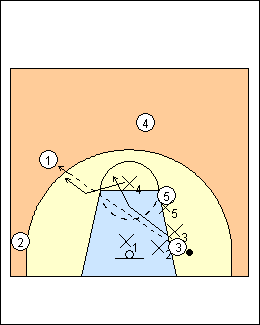
 | 5 With the ball at the attacking left slot, X4 angles 4 towards the sideline, X1 denies, X3 gaps. X3 must help stop 4 on an outside drive, but there will be a help rotation if he can't get there in time (e.g., he was pinching towards 3, a shooter). |
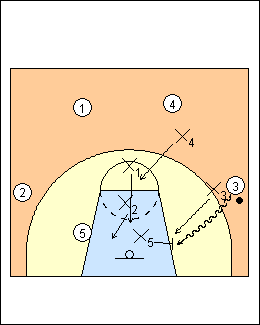
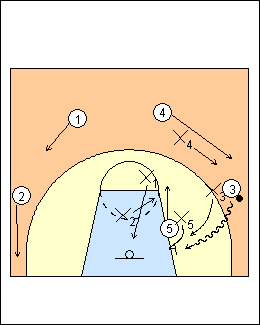
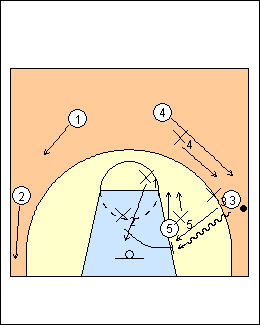
 | 6 With the ball on the attacking left wing, X3 angles 3 towards the baseline (short corner), his top foot above the attacker's top foot. X4 denies the pass to the top, X5 is ballside (open post and no gap defender). On-ball defender X3 cannot be beaten in one dribble. Most players are much less effective dribbling and passing to their non-dominant side. Forcing left-handed players baseline is also effective. X3 should not get beat middle by 3, but if he does, X4 would normally open up and attack the penetration, with X1 bluffing at 4 to give X4 time to recover to his man (X1 should not lose sight of 1). However, denying ball reversal is key, so a coaching option is that X4 does not help on 3 (or bluffs) and a helpside defender cuts off penetration. Ken Shields - X4 must extend to prevent quick ball reversal, he does not help on middle penetration by 3. Ian MacKinnon - denying reversal is key, in an ideal situation we don't want X4 helping assuming that we won't get beat middle. If it does happen, help should come from the weakside block. Billy Donovan - guard dribble penetration from the interior, rotating from inside, step up and trap the ball, rotate opposite, leave open the guy opposite. Don't give a guard a bail-out pass to the wing, make him skip it, there is enough time to recover back to that. Basketball Australia - whether you force sideline/baseline or middle, help usually comes from the splitline and from below the ball (closer to the baseline). Stuart Manwaring - on a middle or baseline drive through the side of the lane, never help from ballside, the second most dangerous attacker is the player closest to the ball and/or basket. Help comes from the back of the defence, up from the basket. When a helpside player comes to help his man will be open, the helpside defence must rotate down to cover him and if necessary leave a man on the outside open for a shot. When the ball is passed back outside, inside defenders who are between the offence and the basket stay with those players (allowing the team to defend attackers closest to the basket), other defenders rotate out. The low-post defender never leaves his man as this is always the next most dangerous player. Roy Williams - deny the corner, but don't ever let a guy drive from the wing, stop the drive, on a pitch-out to the corner that's where they want the ball anyway. Always help if you have to decide between deny and help. If you think a teammate needs help but aren't sure, just fake at him then you can still get back to your man. Ernie Woods - high weakside X1 stops middle penetration, if a low defender steps up it creates an easy passing lane to his man. See Defending - 4 on 3 cover down. |
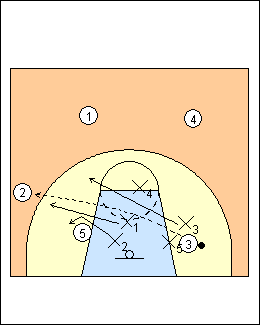
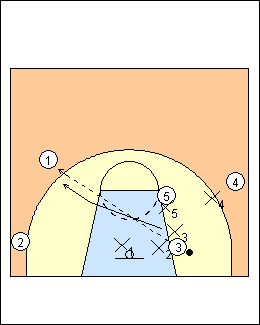
 | 7 Rotation to help - low helpside defender X5 attacks baseline penetration outside the lane. As soon as X5 turns his head and loses sight of 5, he is telling his teammates to help the helper, he is not thinking of recovery. There is a guard drop by weakside X2, he helps the helper by dropping to a position inside of 5. X1 and X4 also rotate down. If X2 is mismatched against 5, an alternative approach is that X2 helps on 3, leaving X5 on 5 (Bob Huggins). Allison McNeill - attack baseline penetration, the lowest weakside defender must meet the ballhandler outside the lane, the high weakside defender must rotate down to ball level. Mike McNeill - with a weakside low post the offence likely creates a "triple i" for weakside defenders. The "low i" attacks the penetration, the "middle i" initially begins to drop and may take the low post at the dots. coachesclipboard.ca - X5 is the nearest defender along the baseline, he has block coverage and attacks baseline penetration, trying to stop it outside the lane. Behind the help defender there must be quick and aggressive rotations to prevent the driver from making easy passes off the penetration. There is a guard drop (or rotation) by high weakside defender X2, who helps the helper by dropping to get inside 5 when X5 leaves. Basketball Australia - help comes from the splitline, the goal is to trap the ball in the short corner. Post defender X5 generally does not get involved (he has no help rule) and must stay with 5. X2 should anticipate the drive and hedge one step when he thinks that 3 may drive (move early). The most likely pass is for a high-percentage layup by 5. Tubby Smith - all defenders retreat to the line of the ball, but ball line is "off" on a trap, the closest man takes the pass out. Mismatches don't beat you, open shots do. Jack Bennett - baseline penetration is vulnerable to weakside rebounding since you have to sink and fill so much. |
 | 8 Rotation from help - on a pass out of the double team, the closest man takes the ball, the beaten man goes opposite the pass and has the attacker left open. X4 takes first pass to 4 or 1. Here X1 closes out on a pass to 2, X3 takes 1, X5 stays with 3, and X2 fronts low-post 5 (a mis-match). Other rotations from help are possible, e.g. - all defenders recover to their own (Bill Self, Kevin O'Neill) - perimeter rotation - the defender nearest the ball closes out, other players rotate to pick up open attackers, perimeter defenders are interchangeable in final match-ups, but post defenders do not rotate out of the paint - full rotation (simpler) - all defenders are interchangeable, and the closest-man rule is used for all match-ups - the defender who came to trap sprints out and takes the free man - switching rotation (Basketball Australia) - the defender(s) who rotated to guard the drive switched on the rotation, on a pass out X3 takes the player that is left open. Allison McNeill - the defensive team must get two defenders to form a weakside "i", with one defender low and one defender high on the weakside. This is necessary to be able to rotate out to the next pass using the closest-player rule. Use the closest-man rule when rotating out to passes to the weakside, the player closest to the ball closes out, the remaining players recover to the weakside and establish block and elbow coverage. Mike McNeill - with the National Team the "high i" would likely take first pass out to the weakside, the player defending the driver will "peel off" and rotate to the open player. coachesclipboard.ca - the closest-man rule is fundamental to successful rotations, which means the closest defender will close out and defend the ball, no matter who it is. Great teams make the first, second and third rotations. Scott Clark - when there are two weakside defenders, the top of the "i" takes first pass, the trapper rotates back to the low i position, and the low i rotates out, the defenders start in a triangle and rotate out man-to-man. When the low i must help, he is always the helper, the high i takes first pass, the trapper rotates to the open man, if he has nobody to bump he is closest man. Stuart Manwaring - X2 would trap with X3 (X5 stays with 5) then stay with 3 because he is between 3 and the basket, X3 rotates out. Jim Larranaga - Scramble - if you leave your man to go trap, you must run out of the trap to find the open man, and run to where your help comes from (here X2 is X5's help). Herb Brown - we want the trapper to sprint out of the trap and be the runner, looking to rotate to the free man in the direction of the pass or be ready to help should the nearest offensive player be covered. Ben Jacobson - X4 is the centre-fielder, one step below the line of a pass to 1 (not 4). He takes any pass to the top of the floor, a skip pass to 2 is taken by X1. The guy who got beat rotates out, the man who rotated to the ball stays. |
 | 9 In this example, the other attackers space on baseline penetration, 2 drifts to the weakside corner, 5 goes to the dots, 4 and 1 fill behind the drive. |
 | 10 If X2 drops to ball level on the help rotation and X1 sinks to get inside 5 (wheel rotation), 1 is the only open player, so beaten man X3 closes out on a pass to 1. If X4 plays in the gap between 1 and 4 he could take first pass and X3 has leftovers, unless denying 4 is paramount. |
 | 11 If X2 helps the helper and takes 5 (gets inside), 2 is basically open in the corner, but he is on the perimeter, not inside. X1 has first pass to 1 or 2, X3 has leftovers. John Calipari - if weakside defender X2 comes and guards 5 that high, then 2 is standing there with no one on him. Ian MacKinnon - X1 takes first pass to 1 or 2. Variation - X2 takes 5, X1 sinks to take 2 (especially if 2 dives inside), 1 is left open, see below (ballside low post). |
 | 12 If low post 5 is ballside, X5 still has block coverage, and attacks baseline penetration. 5 i-cuts on the baseline drive, X5 attacks 3 and X2 rotates to pick up 5. If X5 defends 3/4 from the top, he may have to go behind 5 to cut off a baseline drive. A coaching adjustment is that when the ball goes below the foul-line extended, have X5 defend 5 from the low side so he can open up to cut off baseline penetration (Duke). However, the Florida Gators don't get on the bottom side because of ball reversal by pass or dribble, they have X5 front when the ball is even with or below him. Ian MacKinnon - X5 full fronts if the ball is above the line of 45 then defends 3/4 from the bottom if the ball goes below 45. Herb Brown - doubling the baseline drive is much easier when you front the low post, but it can also be accomplished by stepping out on the baseline side when you are playing behind him. Fronting the post is most effective when there is there is on-ball pressure, making it difficult to enter the ball, and you must always provide weakside help (to prevent a lob pass). Ken Shields - X5 must get to the baseline side of 5 or be in a total front to attack (and trap) any quick baseline drive. Get to the baseline side when the line of 45 is broken. Front a low-post mismatch. Dick Bennett - post defence dictates how you do everything else. Forcing baseline, you can't defend the low post on top and help on penetration. Jack Bennett - if a low-post attacker steps out on a pass to the corner, his defender will go behind to 3/4 from the baseline side (don't fight). Tubby Smith - go behind if you can't go over. coachesclipboard.ca - attack baseline penetration one step outside the lane by the defender giving block coverage, if there is a ballside low post, however his defender is playing he must be very active and not get sealed. Kevin O'Neill - help and recover on drives, not double-teaming, it's always one-pass help, if help has to come from two passes away there's a wide-open three or a dunk. However, on a baseline drive, trap the box, outside the paint. X3 and X5 trap, if X5 gets caught on 5, weakside X2 would trap with X3. Avery Johnson - defend the low post in a 3/4 position at worst, face to face. Seth Millar - if post defence is 3/4 from the high side, don't allow a baseline drive from the perimeter, there is no help on the drive, and with one dribble baseline the post attacker can seal. See Defending - 4 on 1 post. |
 | 13 If X5 is not involved in the help rotation, the low weakside defender attacks baseline penetration. Here ballside low-post 5 spaces up the lane on penetration (i-cuts, as he should), X5 stays with him, and X2 attacks baseline penetration by 3 (similarly, when there is an attacking high post, his defender is not involved in help rotation). Larry Shyatt - X2 stops baseline penetration outside the lane, he can't get there if he doesn't straddle the midline. Ernie Woods - X2 helps on a baseline drive if 5 is at the mid or high post, options are show and recover, trap, and trap early. coachesclipboard.net - if 5 moves up to the elbow to clear out for 3's move to the hoop, X5 stays with him, as soon as 3 starts to dribble, X2 immediately rotates to stop 3 along the baseline, as soon as X2 leaves X1 drops to cover the weakside. Ian MacKinnon - ballside post players can stay with their checks as they space on dribble penetration, it's up to the weakside defender to become the helper. |
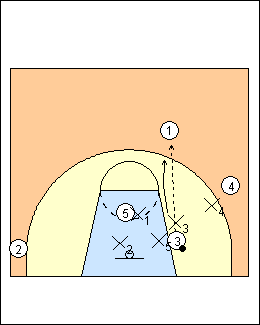
 | 14 X1 is the only weakside defender, there is no weakside i. Rotation from help options are: a) Closest man X1 takes a pass to 1 or 2, X3 has the player left open. (Manwaring - when X2 comes to help, X1 rotates down to cover 2, but does not have to stay with him on a pass outside because 2 is not close to the basket) b) X1 is covering 2, 1 is the only open attacker, so beaten man X3 closes out on a pass to 1 (shown). (Basketball Australia - the defenders who rotated to guard the drive switched on the rotation, so X1 is guarding 2, on a pass out X3 takes open-player 1) Ian MacKinnon - X1 covers "baseline most" 2, the weakside attacker closest to the baseline. X1 closes out on a pass to 2, but if X1 takes the ball on a pass out of the trap to 1, then 2 would be open cutting to the basket, so beaten man X3 takes the ball and X1 again takes 2. See Defending - Fratello 3 on 3 drive and kick. |
 | 15 If 4 does not fill behind the drive (or fills behind but X4 does not deny), there can be a weakside i and X4 could take the ball on a pass to 1 or 4. Ian MacKinnon - closest man X4 takes the ball on a pass to 1 or 4, beaten man X3 goes opposite the pass and has the attacker left open. Basketball Australia - on a pass out to 4, if X4 takes 4, X1 takes 1 and X2 takes 2, a potential problem is that 2 may be left temporarily unguarded (see Scott Clark above). A switching rotation is an alternative method of rotation when the ball is passed. X2 is now guarding 3 and X1 guarding 2, X4 was guarding both 4 and 1 on the initial rotation. If the ball is passed to 2, X1 takes the ball, X4 takes 1 (who is closest to the ball), and X3 takes 4, the player that is left. On a pass to 1 or 4, X4 takes the ball and X3 takes the player left open. A disadvantage of switching rotation is that it can lead to defensive mismatches with bigs defending perimeter players. See Defence - Van Gundy ballscreens (X-action). |
This page was made with Basketball playbook from Jes-Soft