High-low basics
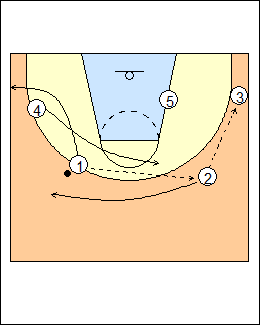
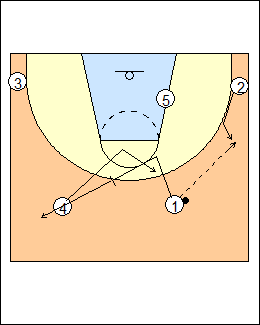
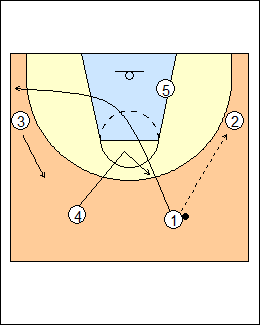 | 1 High-low is a continuity offence that exploits offensive match-ups on the perimeter and inside, and can used against man or zone defence. Wing entry a) The weakside corner is the perimeter match-up spot, here 1 is a perimeter match-up (there can be more than one), on a pass to 2 he basket cuts to the weakside corner, 3 moves high to the reversal (easy) spot, and 4 goes to the high post, into a high-low situation. |
 | 2 There is no help when 4 has the ball at the high post, he reverse pivots and looks for a high-low pass to match-up 5 (if X1 stays out on 1) or a skip pass to 1 (if X1 sags to help on 5). A skip pass to 1 is an attacking situation, look for a shot or drive. Option - 5 crosses the lane to post, 4 dives to replace 5.. If 4 passes back to 2, look to get the ball inside to 5. |
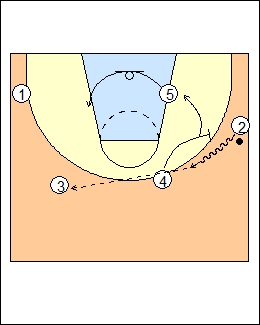
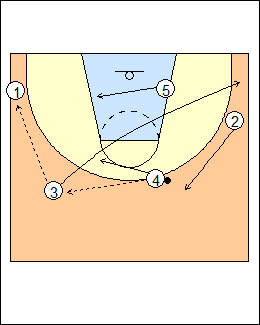 | 3 For continuity (e.g. against zone defence), get into high-low any time the player in the reversal spot finishes the swing, he clears weakside. Here if the ball is reversed through 3 to 1, 3 clears, 4 and 5 flash into another high-low. This is not an attacking situation, but does get 5 in the other low post. See Zone offences - Geno Auriemma (1-4 set), Hubie Brown 1-4 (X-cut on ball reversal). For an attacking situation (1 attacks off the catch), see Fast breaks - Ravens. |
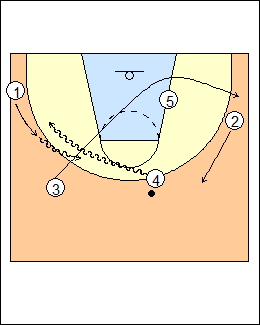 | 4 If there is no skip or high-low pass, 4 can use a dribble-at (dribble-screen) to create an attacking situation, 3 backcuts on eye contact and clears, 1 gets a dribble handoff, 4 rolls or pops. |
 | 5 Here 1 passes to 2 who finishes the swing to 3, 2 clears high weakside, 1 goes back to the match-up spot, 4 flashes into another high-low. |
 | 7 As a call, or if the ball stalls on the wing, 4 can ballscreen, 5 relocates weakside, 4 can roll or pop, then get to the high post if 3 finishes the swing to 1. |
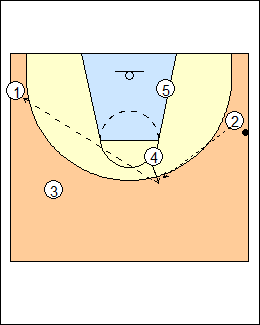
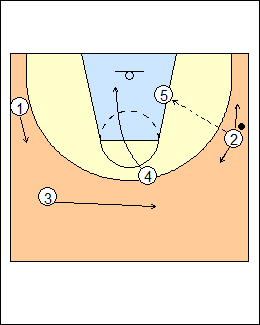 | 8 On a low-post entry, 2 relocates along the perimeter, 4 dives weakside to the basket, 3 replaces 4 (90 degrees above the ball), 1 gets to 45 degrees on the weakside. |
 | 9 If 2 is in trouble on the wing, 5 goes out to the short corner, 3 gets high ballside or behind the ball as a third short passing option, and 1 gets in vision on the weakside. |
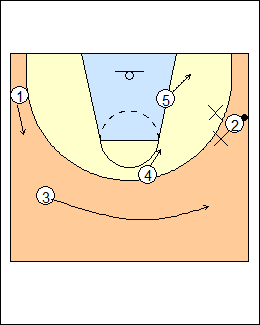
 | 10 b) If 3 is a better perimeter match-up, 1 passes to 2 and clears to the easy spot, 3 stays in the corner. Here 1 backscreens to help 4 get open for a pass. See Offence - High-low sets.  |
This page was made with Basketball playbook from Jes-Soft