Diamond and 1
 | 1 In a diamond and 1, the bottom player can cover the corners as in a 1-3-1, or keep him inside and cover the corners with the wings. Both versions are shown. Defender 3 guards opposing match-up O2 man-to-man, denying passes. The diamond helps defend penetration if O2 gets the ball, or can double-team O2 in scoring range. If the match-up uses an off-ball screen, defender 3 trails the cutter, and a diamond player extends the screen and bumps the cutter (the diamond can help on a curl but not a fade). Trap if the match-up uses a ballscreen (or optionally shock). Ian MacKinnon - if the match-up sets an on-ball or off-ball screen, his defender squeezes. See Defence - Triangle and 2. |
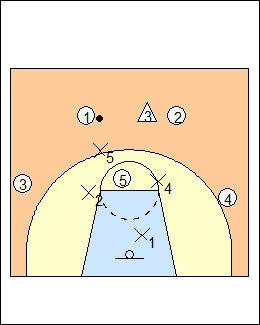
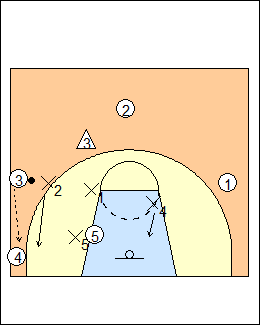
 | 2 1) Extended 1-3-1 slides Slides of the diamond are based on an extended 1-3-1, taking out point defender 3. X5 covers slot-to-slot along the 3-point line, X2 and X4 cover the wings (take first pass, or switch with X5 on a dribble entry), X1 runs the baseline. See Defences - Extended 1-3-1 basics. |
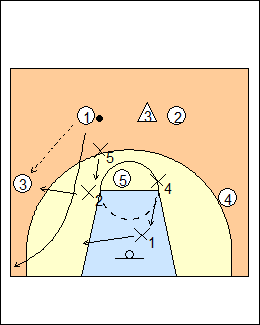
 | 3 X2 takes the ball on the wing (and stays with the ball if 3 dribbles to the corner, and back out), partner X4 has weakside, X5 has high post, X1 has low post. |
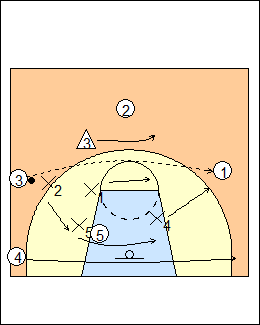
 | 4 X4 takes a skip pass, X2 covers weakside, X5 has high post, X1 has low post. |
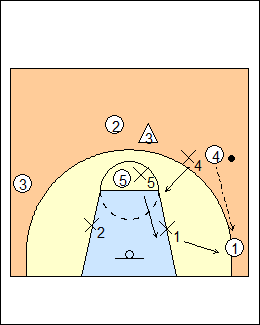 | 5 X1 takes a pass to the corner, X5 covers low post, X4 has high post (not a soft trap or trap). |
 | 6 X4 would bump X1 back if 1 dribbles out of the corner. |
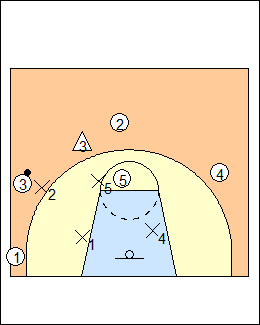
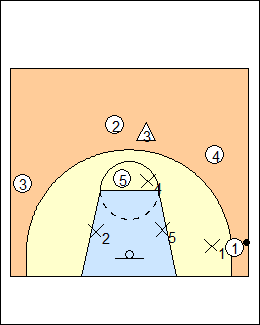
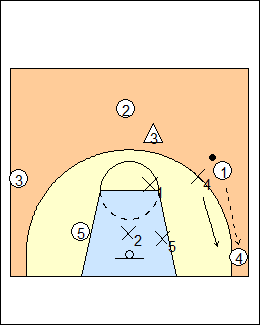
 | 7 2) Keep X5 inside X5 stays inside, between the ball and the basket (does not run the baseline), X1-X2-X4 cover the perimeter. X1 takes the ball above the foul-line extended, X2 and X4 cover the wings down to the corners. Try to force the ball away from the match-up. This diamond and 1 can also be used to double-team a dominant post player, optionally with X4 denying and X3 in the diamond. With the ball out top, X1 could sag to help on the high post. Coach Mac (Box and 1) - in a diamond and 1, X1 covers the ball when it's at the top of the key, denies the high post when it's anywhere else. X2 and X4 defend from the high wing to the corner on their sides. X5 protects the rim. Hoop Tactics - a Diamond and One takes away the middle but gives up the corner. If the corner becomes a problem, switch to a Box and One (which uses the bottom slides of a 1-2-2 and the top slides of a 2-3 zone). Teach Hoops - Diamond and 1 - alignment is similar to a Triangle and 2 but with one chaser not two. Hoop Student - a Diamond and 1 is useful against a team with more than one perimeter shooter. A disadvantage is if the other team can put two above-average post players on the blocks. Option - the wings drop back, see Breakthrough Basketball Rotating Diamond and One (bottom rotations are from the Lute Olson 1-1-3). |
 | 8 X2 takes the ball on the wing, partner X4 has weakside, X1 has high post, X5 has low post. |
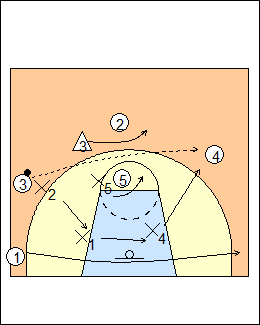
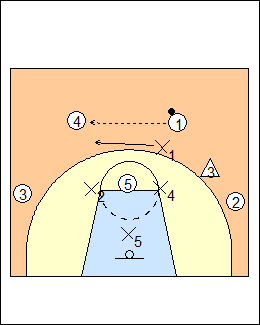
 | 9 X2 would follow a pass (or dribble) to the corner, and force baseline. X5 can front or play behind low-post 5, he does not need to cover the corner (see Hoop Student). AVCSS - Diamond and 1 - X5 fronts 5. Hoop Tactics - the Diamond and One lends itself readily to double teaming a strong post player (with a chaser in front and X5 behind). |
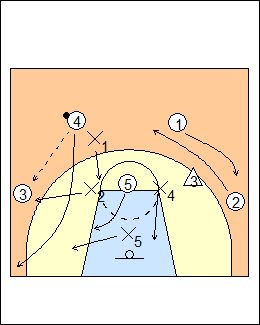
 | 10 X4 covers a skip pass (X1 could bump him), X2 covers weakside, X1 has high post, X5 has low post. Hoop Tactics - any time the chaser's opponent gets the ball, the chaser has strong support from both sides against dribble penetration. |
 | 11 X4 follows a pass to the corner. |
This page was made with Basketball playbook from Jes-Soft