Ballscreen coverage
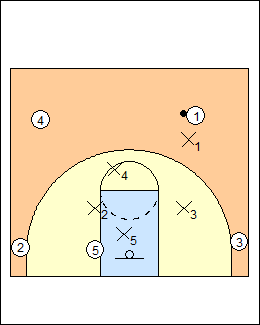 | 1 These diagrams illustrate options to defend ballscreens as described in the Defence Skills Checklist > Ballscreen Coverage (with YouTube links). Also see Blog posts - Ballscreen Coverage. The coverage progression is from passive to aggressive, starting with options for 2-on-2 coverage that avoid rotations (see Matt Woodley), and force the ball into the screen. The screen defender calls the coverage. 1) Gap 2) Switch 3) Squeeze (Jam) 4) Drop 5) Weak 6) Ice 7) Feather 8) Show and Recover 9) Show and Under 10) Shock 11) Trap See Defences - Defending on-ball screens. |
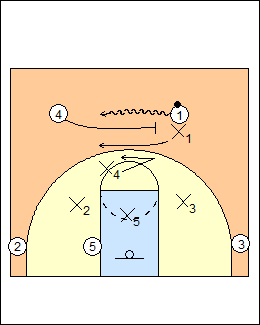 |
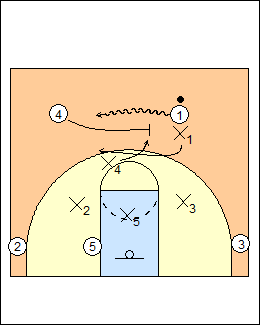
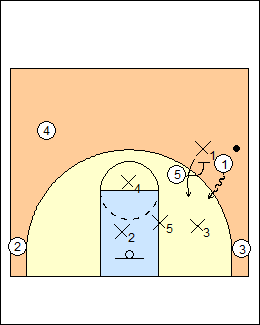
 | 2) Switch X1 goes under the screen to switch, X4 has options. a) To contain dribble penetration, X4 and X1 come together under the screen (touch to switch). Matt Woodley - X1 and X4 switch to touch under the screen. Jim Huber - X4 is at the level of the screen, force 1 out wide, don't let him turn the corner. Greg Kampe - X4 connects with 4 so he can't get split, steps out and takes the ball a step above the screen, don't let 1 come off and take a jump shot. X4 has his belly to the far baseline, it's not a hard shock. |
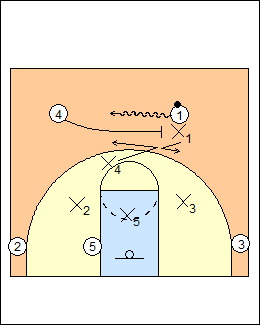
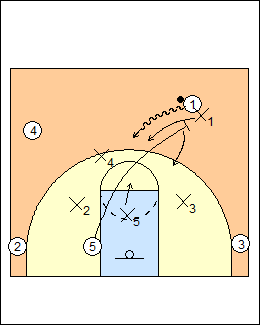
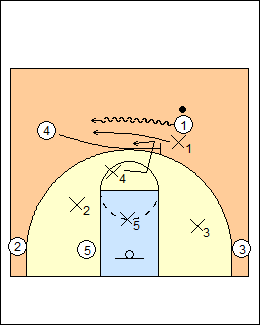
 | 4 b) For a more aggressive switch, X4 shows on the same angle as the screen (jump switch). Ettore Messina - gap outside scoring range, jump switch inside. How to Defend Ballscreens - jump out from behind a screen to steal the ball, the dribble is predictable.  |
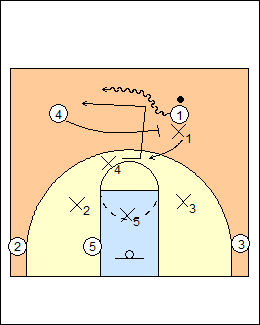
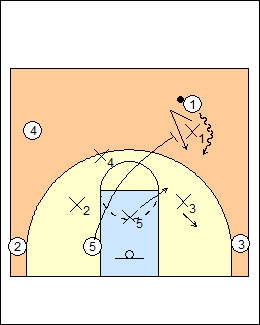
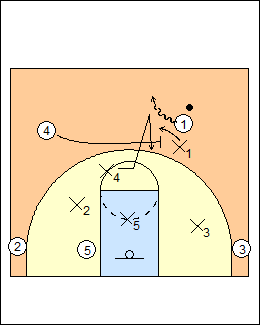
 | 3) Squeeze (Jam) X4 jams up into the screener, X1 goes under both, recovers to X1. Can be used if 4 is a pick and pop shooter. Kyle Gilreath - it is easiest to jam a screen when the screener is stationary, not sprinting into the pick. Chantal Vallee - if 4 is a good shooter, switch or jam, he will be open if you hedge. Alvin Gentry - squeeze is a great way to defend a middle ballscreen, otherwise the screener can move down. |
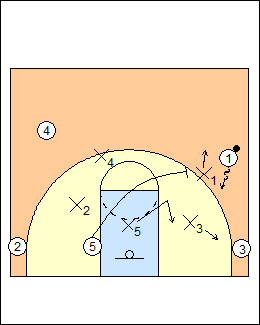
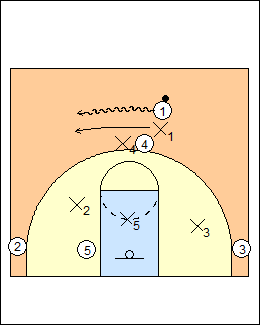
 | 4) Drop (Soft) X5 zones up below the screen, contains the ball and keeps screener 5 in front of him. X1 chases over the top (or goes under), tries to recover to the ball or at least contest from behind. Drop-and-under is exaggerated gap coverage. X5 will zone higher if 5 is a pick and pop shooter. If X1 gets beat, he and X5 may have to switch late. Another option is a peel switch, X4 takes the ball, X1 runs through to take 4. This could be a planned tactic if 1 is a great player. |
 | 5) Weak Force left (but not give left) into drop coverage. X1 denies access to the screen, X5 helps to contain the ball. |
 | 6) Ice (Force Down) On a sidescreen, refuse access, force the ball down into drop coverage, X5 helps contain the ball (with a corner filled, X3 can also help). Dave Smart - they weak everything on this side of the floor (ice). Ice options - Blitz (X1 and X5 trap) - Switch or Veer (e.g. if X1 gets beat, or a shooter picks and pops). Avery Johnson - sidescreen and close-out defence should be consistent. If the close-out is high-side, forcing baseline, then force the pick and roll baseline (trap and rotate to leave the furthest attacker open). |
 | 9 Also ice if 5 readjusts the screen, X1 goes over or under a step-up screen. X5 recovers if 5 pops for a pass, or X4 stunts then X5 recovers, or can X4 take 5 if he is a shooter. |
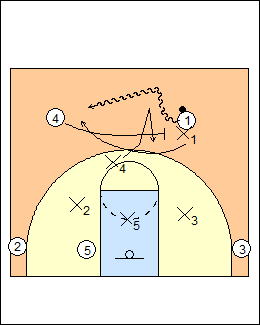
 | 7) Feather (Soft Hedge) X4 gets to the level of the screen, soft (flat) hedges laterally (staying attached), X1 goes over the screen and X4. - never get screened, erase a ballscreen using forearm leverage, close space before the screen hits, forearm to body, controlling the path, taking away the reject, staying connected. - turn screens into offensive fouls, pivot your outside leg over the screen, fight over with force. |
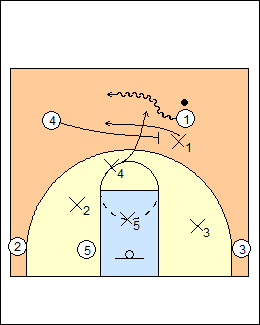
 | 8) Show and Recover X4 shows on the same angle as the screen but stays attached, re-directs 1 then recovers to 4. |
 | 12 X1 goes over the screen and X4. |
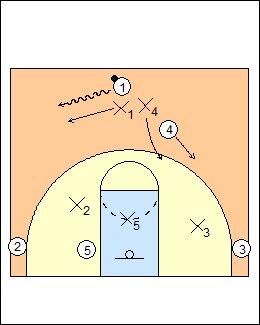
 | 9) Show and Under X4 shows and recovers, X1 goes under the screen and X4 to meet 1 on the other side. Roy Williams - the Tar Heels show and go over, show and go under, or trap. What's the Best Way to Guard Ballscreens - get under as many ballscreens as you can so you don't have to help or switch. If you go over and get clipped it forces the screen defender to help, getting two on the ball and opening up a short roll. By going under, the defence can show without getting two on the ball. |
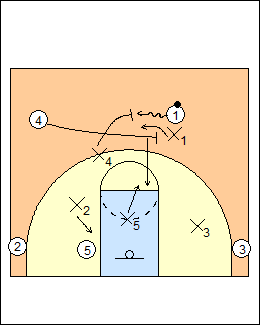
 | 10) Shock (High-Low) X4 shocks high to redirect 1 (does not stay attached to 4), X1 goes over the screen and under X4 to stay with 1. Alvin Gentry - if not executed properly, X4 and X1 will run into each other. Dave Smart - Shock and under - X1 goes under the screen (see Show and Under). They shock when going under (there's no split), show when going over. Jeff Van Gundy - X1 can go over the screen or under it (the higher the screen, the worse the shooter). |
 | 15 X4 recovers to 4 after X1 goes under. |
 | 11) Trap X1 and X4 trap, someone covers the screener (it could be X4). Usually trap until a pass. Dave Smart - attack blitz (shoot gaps) or control blitz (make him pass). |
This page was made with Basketball playbook from Jes-Soft